Heat pumps are the most efficient way to heat and cool a home, but they’re not all created equal. Geothermal, or ground source, heat pumps are more efficient and effective at a wider range of temperatures than air source, but at a cost. It’s way more expensive up front, but that should even out over time…at least in theory. I’m going to be the guinea pig for everyone out there because we went with a geothermal system for our new home. What does the setup look like? What do the costs look like? And in the end … is it going to be worth it?
Using heat pump systems almost feels like cheating because of how you get more energy out than you put in. They seem to defy physics, but the laws of thermodynamics are still in play; heat pumps do end up using a little energy transporting heat.

While heat pumps are hands down the most efficient way to maintain comfortable temperatures within your home, they’re not without their disadvantages. Standard air source heat pumps tend to have a slightly higher upfront cost versus the traditional gas and electric HVAC systems out there. And in the past, heat pumps have struggled in very cold climates, but that’s changing with newer air source technology like variable speed compressors, smart controls, and advanced defrosting. On all of those points, I’ve got videos that go more in depth if you’re interested.
But if you want the Bugatti of heat pumps, most people will point you to geothermal, also known as ground source heat pumps. When my wife and I started building our new home with the goal of trying to achieve net zero energy, geothermal was definitely something I was interested in for its efficiency alone.
That brings up a very important point to lay out right at the top: goals. I’ve said this about my experiences with solar panels on my previous home. If you want to figure out if something is worth it, you have to clearly lay out your goals. These are of course personal decisions, so my goals may not align with yours. But in my case, my wife and I set out to create our forever home. For us, that meant building with components that had:
- A long expected lifespan of the gear and construction methods we chose.
- High efficiency for lower energy use and monthly cost of operation.
- Because we have solar power, this will help achieve net zero energy over the course of the year.
- Upfront costs that will make sense over the expected lifetime of the product and our time in this house.
That last point is tightly linked to the first two and how long we’re planning on living here. But before I discuss whether or not my geothermal system helped my wife and I achieve these goals, I want to explain why we sprung for it in the first place. So, here’s a super quick recap of why geothermal is so efficient. Instead of extracting the heat out of the air around your home, which is obviously affected by temperature fluctuation, a geothermal system exchanges heat from deep underground, where the temperatures don’t really change much at all. Once you get down to about 6 to 10 feet below the surface, the earth becomes a consistent 50 F or 10 C. The actual temperature will vary a bit based on where you live. Either way, no matter what time of year it is, we can always count on having that 50 F to pull heat from in the winter or move heat into during the summer. The exterior air temperature is less of a concern. Again, I’ll refer you back to my previous videos for an in-depth primer on how heat pumps work, but by using a compressor they can boost that heat up or cool it down as needed.
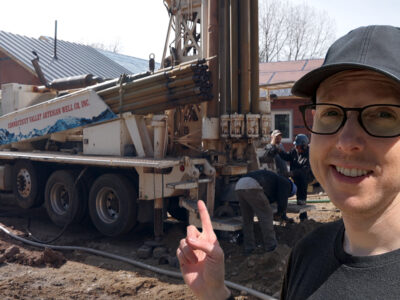
For my home, that meant drilling a single geothermal well down about 400 feet and feeding a closed loop tube into the well and back up into the house. The process of drilling the well was fascinating, which I also covered in a previous video. However, the one thing I didn’t get into was the cost.
Drilling our geothermal well cost $18,550, which definitely has some sticker shock to it (it gave me pause too). But before we get too caught up on the cost, know that it’s specific to my location and what we had to do here. My house had to go with a vertical well due to the space constraints and the location, but if you have the room, you can go with a horizontal loop. That’s when they dig down maybe 6 to 10 feet around a large area of your property, then loop the line horizontally before filling the earth back into place. It’s a cheaper option versus drilling a vertical well, but requires more space.
On that note, there are companies bringing more compact and efficient drilling rigs to the market, which should help to drive the cost of drilling down. The U.S.-based company Terrasonic is doing this with sonic drilling rig technology. Let me know if you’d be interested in a video going into further detail.
Back at my new home, our geothermal runs up into the mechanical room, the house’s beating heart. You can see the lines coming up into the room over there and then over the WaterFurnace Series 7 geothermal system over here. For full transparency, Waterfurnace did partner with me on this build and helped supply some of the system, but my opinions are my own and they had no say over anything in this video. They’re seeing this for the first time along with all of you.
The specific reason I wanted to go with the Series 7 was its variable speed, so it can ramp itself up or down to keep the house at a precise temperature. In my previous house, we had a high efficiency gas furnace and central air, which was two-stage. Most systems work that way. A stage operates at a predefined speed and efficiency. For example, one-stage may be at 50% capacity and then the second stage would be 100%. That means the system kicks on and off at random intervals to maintain a comfortable temperature. Being variable means it can ramp down to 10% or just up to 40% for whatever it needs … less kicking on and off.
Probably my favorite part of this geothermal setup though is the desuperheater. That helps us create a lot of hot water at virtually no cost. What is a desuperheater? Well, at a high level, when a geothermal system is running, the compressor is doing all the heavy lifting to get the air to the right temperature. That operation itself generates excess heat. A desuperheater captures that excess heat and cycles it into a holding tank filled with water. For no extra energy costs, you get hot water from heating and cooling the air in your home. My desuperheater tank then feeds into a heat pump water heater that can top up the hot water if it’s not hot enough before delivering it to the faucet or shower. On average, a desuperheater can supply roughly half your hot water needs in the house. I’m planning on doing a deeper dive into my hot water setup, the challenges we had getting it ready, and more, so stay tuned for that one.
Over here, you’ll see a Renewaire EV-L energy recovery ventilator (ERV). This is what’s supplying our house with fresh air while exhausting the stale indoor air. An airtight home is great for energy efficiency, but it’s also great for controlling how the air is coming into and out of the house. The way it works is pretty clever, and simpler than you might think. In my house I have a series of exhaust vents: one in each bathroom, one in our laundry room area, and one in the kitchen. The ERV is running 24 hours a day at a very low level and exhausting the stale air out the back of the house.
The first time I heard of ERVs my initial thought was, “Isn’t that just ejecting all the heated or conditioned air that you just created?” Turns out, not really. Instead, the ERV passes the stale inside air through tiny vents on the way out. Parallel to those vents are another set where fresh outside air is passing through as it comes in. These areas are separate but in contact with each other, and a fair amount of heat moves from the hotter vents to the cooler vents. This means that in the summer you’re precooling hot outside air as it comes in. Conversely, in the winter you’re heating cool outside air as it comes in. It’s really … cool.
In my home system, the fresh incoming air is filtered, then mixed with the recirculated air inside the WaterFurnace system and finally distributed through all the HVAC vents throughout the house. There are higher end ERV systems, like Zender, which have dedicated intake and exhaust lines separate from the HVAC system. The setup we went with was sufficient for our house and saved us some money. I’ll get to the costs in just a bit.
One side benefit to the ERV is that I opted for a higher MERV-rated filter. MERV stands for Minimum Efficiency Reporting Values and lets you know what sizes of particulates it will filter out.1 We’ve got MERV 13 filters, which capture the majority of particulates over 1 micron and about half the ones smaller than 1 micron. I’ve got pretty bad allergies, and August and September are the worst months for me, but I’ve had no noticeable issues in this house. My wife also commented within the first week of living here that “The air in the house feels super fresh all the time.” You’ve gotta love an ERV.
This piece of gear that you can see over here in my mechanical room is a whole-home dehumidifier. Because of the airtightness of my house, there will be times of year, like the spring and early fall, where the Waterfurnace system won’t be running enough to really dehumidify the air. I’ve experienced this in our previous house too. The central air conditioning on the house would hit temperatures so fast that the air wouldn’t get dehumidified. The problem is as the relative humidity level gets closer to the temperature, like 70% humidity at 70 F … it gets a bit uncomfortable. This dehumidifier removes that issue … and again, so far it’s doing a great job at that.
Now, about those costs …
The Waterfurnace system, including the desuperheater and what it took to run venting throughout the house came out to $59,450. The ERV, dehumidifier, and the associated ductwork came in at $21,000. So, for all tech that I’ve walked through, we have a grand total of $99,000. Yep, you heard that right: Almost $100k. Have your eyes popped out of your head yet? Because I’m still trying to get mine back in.
While you’re feeling around for your corneas, let me give you some added context for those figures. First of all, this was a new house, so that price includes the cost of running all the new ductwork and the labor involved. The vertical geothermal well is a pricer option versus a horizontal loop, so that jacked the cost up, too. All in all, the budget you’d need for updating an existing house would likely look very different from mine.
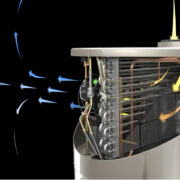
But that raises the biggest question: was it worth that cost? Before you jump the gun and say, “no,” let’s walk through the other options we weighed before going with geothermal. We also considered air-source ductless mini split heat pumps and a more traditional central air source heat pump system. Just the air-to-air central heat pump system would have cost around $38,000, but that’s not including the hot water, dehumidifier and ERV system, so that doesn’t equate to as big of a gap. For a more apples to apples comparison, the WaterFurnance system and drilling the well cost $78,000, which means that we spent about $40,000 more than we would have with the airsource system. Still a hard pill to swallow.
However…there’s a clean energy Federal tax credit of 30%, much like with solar, that you can claim on your tax return. That means my wife and I can deduct $23,400 from how much we owe on our taxes this year. And this brings the out-of-pocket costs of the system down to about $54,600. Still more expensive, but we’re now down to about a $16,600 premium for the geothermal system.
Again, worth it? Well, if you’re focused on just the upfront costs, the answer looks like no, but this is our forever home and we’re looking at things in the long-term. Once again, I want to stress the importance of setting your own goals. For us, efficiency was high on our list. This system is dramatically more efficient than the central air-to-air system I’ve been comparing it to. My geothermal system should cost almost half of what the other system would each year. That could be roughly a $1,000 saving year-to-year.
This chart wasn’t for the WaterFurance system specifically, but it’s comparing the operating costs of another comparable geothermal system we looked at to the air-to-air system. Looking at a five, 10, and even 25 year timespan, you can see how the geothermal system closes that gap easily and ends up coming out way ahead. It might take 14 to 15 years for my specific setup to hit that point of parity and then come out on top. But again, if you’re upgrading an existing house and can do a horizontal loop, you could potentially hit that price parity in seven to eight years.
For my wife and I, though, the longevity of the system was appealing. The well we drilled shouldn’t need any real maintenance in our lifetime. They can last over 50 years easily. And the actual mechanicals inside the house typically last 20 to 25 years (maybe even longer with good maintenance), where mini splits might need to be replaced after 10 to 15 years. Plus, this includes the hot water generated by the system, which might be as little as a couple hundred dollars in electricity each year. That’s about half of what it might cost without the desuperheater system included.
So, was it worth it? Given my goals, it’s ticking all the boxes, but the jury is still out. I’m going to be making update videos over the course of my home’s first year or two documenting what I’m seeing and experiencing with the system. I’m hopeful that it will come very close to the projections. I saw similar things play out with the solar panel system on my old house, so I think this will be the same … but you never know.
At the end of the day, I’m a fan of “heat pump all the things” whether that’s air source or ground source. With the latest technologies, it’s really hard to go wrong.


Comments